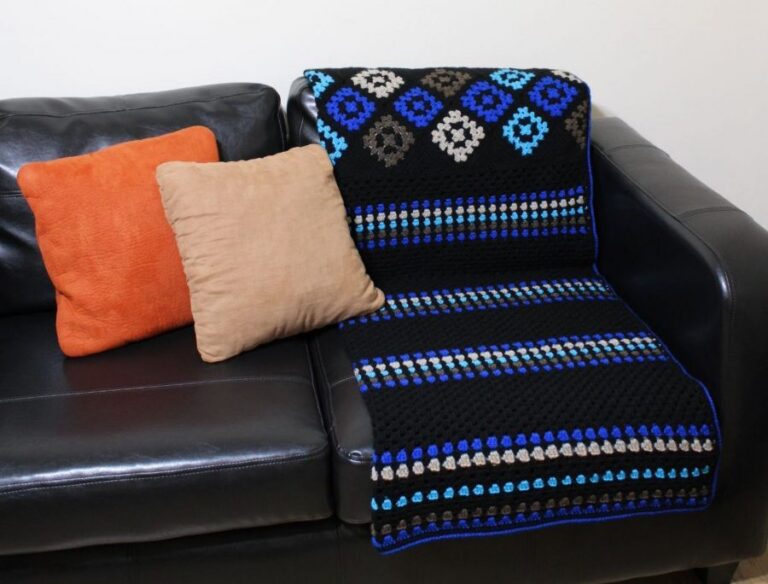
Grampy Blanket (Part III)
Welcome to the final part of the instructions to make the Grampy Blanket, you have it almost ready to be washed, and soon you can wrap yourself on it while watching tv or reading a book, I love an extra layer of clothes while I’m in the sofa, so for me an extra blanket available in the house is always, always a good option!
Last week, we finished the step 3 by filling the gaps between the squares and half squares. This week, we will be finishing the remaining parts that is completing the top and bottom and also adding a border. I didn’t count the part of hiding all the tails as a step, and I totally advise you to do this as you go because it can be exhausting to do it only in the end.
If you arrived to this pattern just now, you can check the others parts of this project by clicking here and here.
Are you ready to finish this beauty? Let’s go! 🙂
Step 4:
Hook 4.5mm.
The following step repeats for each side of the panel using the main color.
Starting on the right side, sl st on the top of first dc of the half square/triangle, ch1
Row 1: Sc in the same space, *sc in the next 22 ch spaces/stitches from the filled space, 2sc in the ch2 space from the square* all the way ending with 1sc in the top of the last dc stitch of the triangle on the left. Total of 192 stitches.
Change to hook 4mm
Row 2: Ch2, turn, 191 hdc all the way until the end of the row.
Step 5:
Start this step with main color, that you can carry from the previous rounds.
Top of the blanket
Row 1: Ch3, 2dc in the same stitch, ch1, * skip 3, 3dc, ch1, repeat from * all the way of the row, finishing with 3dc on the top of the last stitch. Turn.
Row 2: Ch4, * 3dc on the ch-1 space from previous row, ch1, repeat from * all the way of the row, finishing with 3dc on the top of the last stitch. turn.
Row 3-5: Repeat rows 1 and 2. Fasten off to change colour.
Row 6-14: These rows are worked like rows 1 and 2 of step 4 but alternating colors. At the end of each row, fasten off and join new color.
Row 15-19: These rows are worked like rows 1 and 2 but only with the main color. Fasten off at the end of the last row. End with a row 1.
Row 20: Repeat row 2 with secondary color of choice.

Step 6
Bottom of the blanket
-
Repeat Steps 2 and 3
-
Continue using main color
Row 1: Ch3, 2dc in the same stitch, ch1, * skip 3, 3dc, ch1, repeat from * all the way of the row, finishing with 3dc on the top of the last stitch. Turn.
Row 2: Ch4, * 3dc on the ch-1 space from previous row, ch1, repeat from * all the way of the row, finishing with 3dc on the top of the last stitch. turn.
Row 3-5: Repeat rows 1 and 2. Fasten off to change colour.
Row 6-14: These rows are worked like rows 1 and 2 of step 4 but alternating colors. At the end of each row, fasten off and join new color.
Row 15-29: Repeat the stitch pattern with main color. At the end of row 29, fasten off and join new color.
Row 30-77: Repeat doing 15 rows of main color and 9 rows of alternating color from secondary to main. At the end of row 77, fasten off and join new color.
Row 78-90: 1 row secondary color, 1 row main color, 1 row secondary color, 3 rows main color, 1 row secondary color, 3 rows main color, 1 row secondary color, 1 row main color, 1 row secondary color.

Step 7: The border
With 4.5mm hook
Sl st on top of any stitch of previous row (I prefer to start close to a corner). Make 1sc across the stitches of previous rows, 3sc along the sides and 3sc in the corners. Fasten off
For the contrast color in the border: Sl at through any stitch of previous row, 1sl st across. Fasten off.
Fasten off and wave all those pretty ends.
Tag #myindycraft to show me your Grampy Blankets, I will love to see it!